
git-crash-course-en.md 27 KB
Git crash course
Davide Alberani da@erlug.linux.it 2017-2018
Crash course to not bang your head against the wall when you have to use Git.
git clone https://git.lattuga.net/alberanid/git-crash-course-en.git
This work is licensed under the Creative Commons Attribution-ShareAlike 4.0 International License: http://creativecommons.org/licenses/by-sa/4.0/
Who is this for
For beginners who have to work in small teams
Course layout
Part 1
Basics to work with local and remote repositories
Part 2
A workflow for collaborative development
Part 3
Some more advanced tool
What we will talk about
basic, high-level, command line tools. Also known as porcelain, they are based on others, lower-level, commands (known as plumbing)
how to manage branches
basics to work with remote repositories
a workflow to cooperate with other developers
What we will NOT talk about
- low-level (plumbing) commands
- Github web GUI (sorry, it's just an hosting service)
- GUIs
- how to admin a remote repository
- flame wars on the merits of different workflows
What's Git
A dirstributed control version tool.
It's used to keep track of changes to code (or other textual stuff) and to ease the cooperative development. It's worth to remember that it was born to help mostly who had to coordinate other people's code.
More details on Wikipedia.
What Git is NOT
- it's not Subversion or CVS
- it's not a backup tool
- it's not a deploy tool (or maybe it is, but think carefully about it)
Some will say
Git will have no secrets for you, once you'll understand...
- ...its data model (objects, blobs, trees, commits, refs, tags, ...)
- ...that everything is local
- ...that commits are snapshots, and not deltas from the previous state
- ...some strange quantum theory
Honestly?
That's all true, but its UI is a mess.
Basics: definitions
Working directory: the files and directories you're working on
Staging area (or Index): where we store changes that will be included into the next commit
Commit: a snapshot of all files and directories at a given moment
(do a) Checkout: update files in the working directory to a given branch/commit/...
HEAD: the point over which we'll connect the next commit (usually, the current branch)
refs: collettive name to refer to HEAD, branches, tags
Basics: use git config to setup the environment
$ git config --global user.name "Davide Alberani"
$ git config --global user.email da@erlug.linux.it
$ git config --global color.ui auto
Settings can be stored in these files (in reading order: the latter will overwrite previous settings):
- /etc/git/config: global options, valid for every users
- ~/.gitconfig or ~/.config/git/config: settings for the current user
- .git/config in the current repository: local settings valid only for this repository
Bonus track
- Some examples of gitconfig files are this one and this other one
Basics: some common settings
Aliases:
$ git config --global alias.st status
$ git config --global alias.br branch
$ git config --global alias.co checkout
Colors:
$ git config --global color.branch.current "yellow bold"
$ git config --global color.branch.local "green bold"
$ git config --global color.branch.remote "cyan bold"
$ git config --global color.status.added "green bold"
Github user:
$ git config --global github.username [nome]
Part 1
Where we give what's needed to work locally and remotely
Basics: create a repository
Initialize a repository starting from a directory (empty or not):
$ git init
Clone an existing remote repository:
$ git clone https://git.lattuga.net/user/repo.git
create a repository: what happened?
It created the .git directory (the repository); if we made a clone, a reference to the "origin" remote was added.
Bonus track
- remote repositories are usually created with --bare (they have no working directory); nobody works directly on them: developers commit on their own clones and push the changes.
Basics: status
To know the status of the repository, staging area and working directory (a nice cheatsheet):
$ git status [-s]
File states
Untracked: new files in the working directory, not yet added
Unmodified: files that were not modified since the previous commit
Modified: modified in the working directory, but not yet added to the staging area
Staged: added to the staging area, ready to be committed
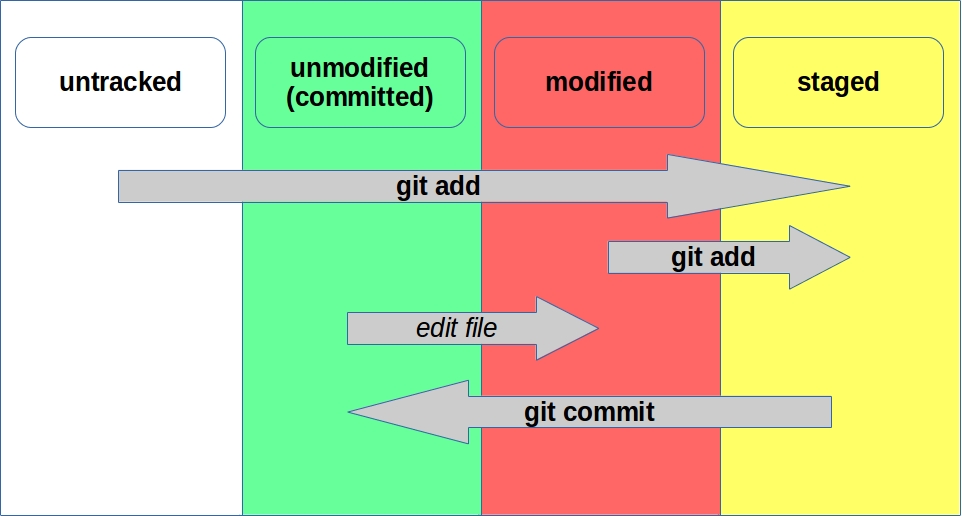
Basics: add and commit
Let's change a file and add it to the staging area:
$ git add test.txt
Lets commit it:
$ git commit [-m "commit message"]
Let's see what happened:
$ git log
add and commit: what happened?
We added a file to the staging area, and saved a snapshot of our work. If we are in a branch, this branch now points to the new commit (HEAD still point to the branch, so it also points to the new commit).
Bonus track
- guess what git rm and git mv do
- commit often
- how to write a nice commit message? Issue, short title, long description
- it doesn't save empty directories; if needed, add a .gitkeep (just a convention)
- create a .gitignore file to exclude some files
What's a commit?
Commits are snapshots of the system at a given moment, identified by an hash (e.g.: 6d7696a8b8).
A commit hash is generated by: message, committer, author, dates, tree, parent hash.
Bonus track
- it's possible to shorten the hashes, as long as they stay unique (e.g. 6d769)
- for more details see anatomy of a Git commit and Git Internals
Basics: history
$ git log [--stat] [--patch] [--graph] [--decorate] [--color] [-2]
Shows the commits history from the current point (or from a given refs) down to the very first commit.
You can limit the output to the latest N commits with -N
Bonus track
- see commits that changed a given file: git log -- file.txt
- to see information about a single commit you can also use git show
- information about who edited the lines of a file: git blame file.txt
Basics: diff
Let's change a file, without adding it to the staging area:
$ git diff
To see what was added to the staging area (and reason why it's so useful):
$ git diff --staged
Basics: tag
A tag is a pointer to a commit:
$ git tag -a v1.0
Bonus track
- there are two types of tags: lightweight and annotated. The firsts are just pointers, the seconds are objects with an author and can be signed.
Damage control
How to modify the last commit (change commit message or author, or change a file - in this case you first need to modify it in the working directory and then do git add):
$ git commit --amend [--author="Name Surname <user@example.com>"]
A file was added by mistake to the staging area:
$ git reset HEAD -- file
Revert a file to the last committed (or staged) state:
$ git checkout -- file
Bonus track
- using --amend the commit ID will change, for this reason you can only use it on the very last commit of a branch
- git clean -f to remove all the untracked files
Damage control: harder
I made a mess in the working directory. Let's bring everything to the last commited state:
$ git reset --hard HEAD
I want to create a new commit that revert the changes introduced in a given commit:
$ git revert [-n] <commit>
Bonus track
- more informantion on reset
- workflow to solve problems
- some useful commands to solve mistakes
Branches: what they are and why to use them?
They are moving pointers, moved with each new commit.
They are useful to separate different strands of development and to integrate contributions from others.
Branches: create
Create a branch:
$ git branch fix/bug-123
See all branches:
$ git branch [-a] [-v]
Remove a local branch:
$ git branch -d [--force] fix/bug-123
Branches: switch between branches
Let's move to another branch:
$ git checkout fix/bug-123
Create and move in a single command (only if the branch doesn't exist):
$ git checkout -b fix/bug-123
Bonus track
- moving, Git tries to keep the changes in the working directory and staging area
Branches: more information
master is just a default (usually master is considered "stable")
give meaningful names; use suffixes like bugfix/, fix/, improvement/, feature/, task/) and issue numbers
get used to create a new branch (that usually will start from master) each time you need to fix a bug or develop a new feature
may be logically divided in feature (o topic), release, integration branches and so on
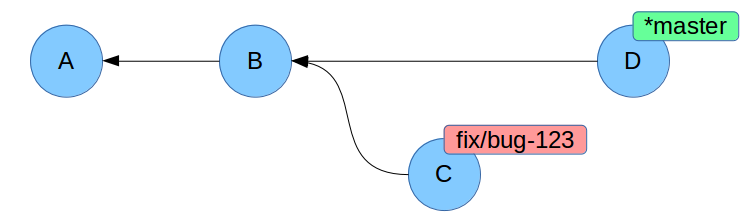
Put the pieces back together: merge
$ git checkout -b fix/bug-123
$ # let's edit newfile.txt
$ git add newfile.txt
$ git commit
$ git checkout master
$ git merge fix/bug-123
Merge: what happened?
A fast-forward!
master was behind compared to fix/bug-123, and so we simply moved master's pointer. There was no need to create a new commit.
The commit command takes the --ff-only and --no-ff options decide how to behave regarding the creation of a merge commit.
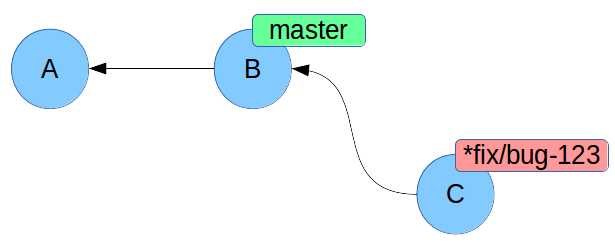
Conflicts resolution
$ git branch fix/bug-123
$ git checkout fix/bug-123
$ # let's edit file.txt
$ git add file.txt
$ git commit
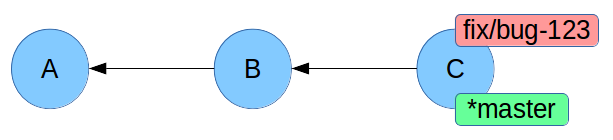
$ git checkout master
$ # let's edit file.txt differently, on the same lines
$ git add file.txt
$ git commit
Bonus track
- which commits are part of the fix/bug-123 and master branches?
Conflicts resolution
Let's merge:
$ git merge fix/bug-123
$ # let's resolve the conflicts
$ git add file.txt
$ git commit

Bonus track
- what happens to C commit, if we delete the fix/bug-123 branch?
Conflict files
Always look for every <<<<<<<, ======= and >>>>>>> markers
Bonus track
- you can use meld to solve the conflicts
Working with remote repositories
$ git remote add origin https://git.lattuga.net/user/repo.git
$ git remote -v
Bonus track
- origin is just a default
- you can checkout a remote branch like remote/branch (e.g.: git checkout origin/fix/bug-123)
Fetch & pull
Update the local repository with the new commits of a remote:
$ git fetch --prune origin
See which commits are different between local and remote:
$ git log --left-right master...origin/master
Update the remote changes and merge then in the current branch:
$ git pull origin
Bonus track
- git pull is the same as git fetch ; git merge
Local and remote branches
local branch: a branch you only have locally
remote branch: a branch on a remote repository
remote tracking branch: local copy of a remote branch; you can update it with fetch, but can't work directly on it
local tracking branch: a local branch you can work on, tracking another branch (usually a remote tracking branch)
local tracking of remote branches is done automatically, based on the name of the branch: if in a remote repository the branch origin/branch-1 exists, the git checkout branch-1 command will create a local tracking branch
Push
Add a local branch to the remote repository:
$ git push --set-upstream origin local-branch-name
Send local changes to a remote branch:
$ git push [--tags] [origin [master]]
Bonus track
- by default, git push does not send tags, which must be pushed separately with the --tags argument
- how to remove a remote branch: git push --delete origin branch-name
Talking about remote history...
A thing to NEVER do (unless you know exactly what you will face): change an already-pushed history.
That's because if someone else is working on the same remote branch, the repositories will no longer be coherent.
Part 2
Where we will show a ready-to-use workflow, to work with a remote repository as a team
Which workflow?
Deciding which workflow to follow, you need to answer some questions like:
- who are the developers? Do you accept contributions only from a small group, or from anyone?
- how do you release the software? Do you have multiple versions to support? The new versions are developed starting from which branches?
- who is in charge of integration (merging)? The developers, or a specific person?
Worflows: multiple options
The main worflows are:
- centralized
- feature branch
- gitflow
- forking
- something kept together with rubber bands
Some resources to decide:
- https://www.atlassian.com/git/tutorials/comparing-workflows
- https://guides.github.com/introduction/flow/
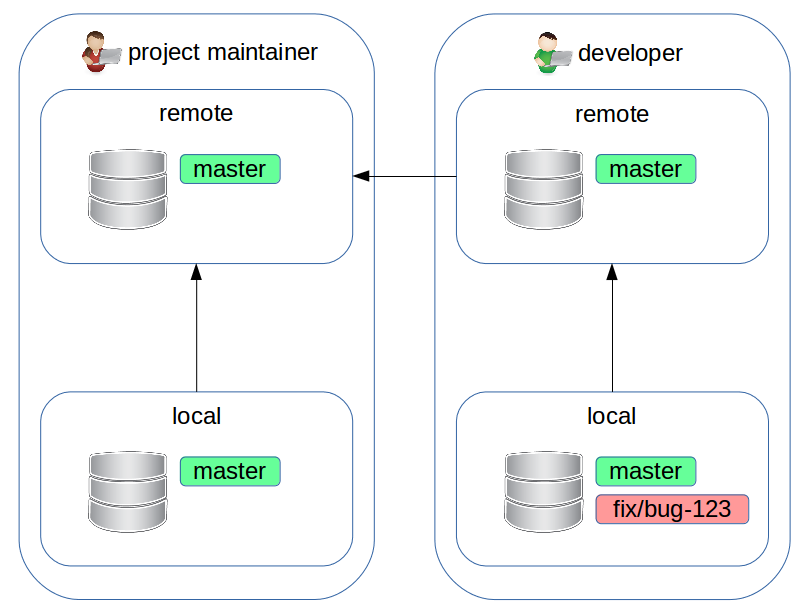
Forking workflow
We'll see the forking workflow. It's not "the best" (no workflow is), but is the one you will deal with on Github, for example. Some useful definitions:
- there is an "official" repository (that we'll call upstream, from the developers' point of view); only core authors can write on it
- project maintainer role: the person in charge of merges on the upstream repository
- developer role: a person who is developing a fix or new feature
- each developer will have a remote fork of the upstream repository and a local clone of this remote fork to work on
Forking workflow: maintainer setup
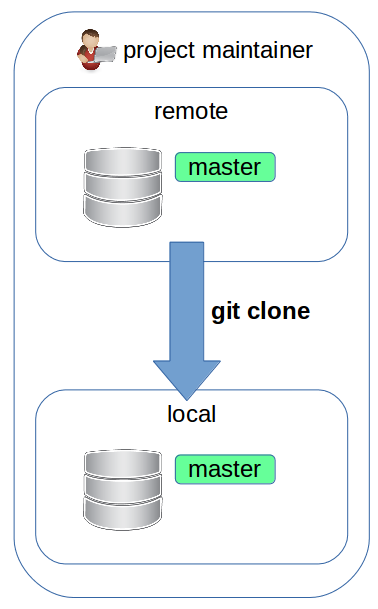
The project maintainer created the remote upstream repository and a local clone.
$ git clone https://git.lattuga.net/maintainer/repo.git
Forking workflow: developer setup
The developer now will:
- create a remote fork of the upstream repository
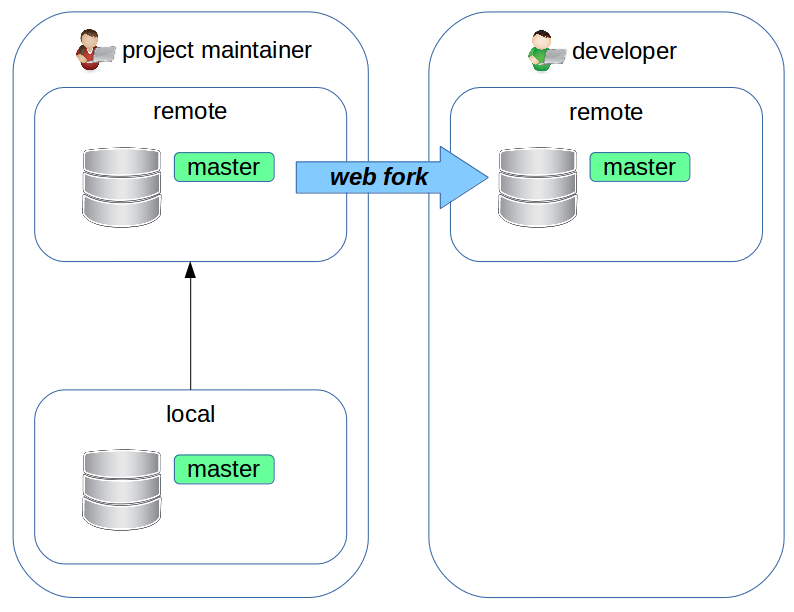
Bonus track
- a fork is nothing more than a clone (with --mirror) of a repository
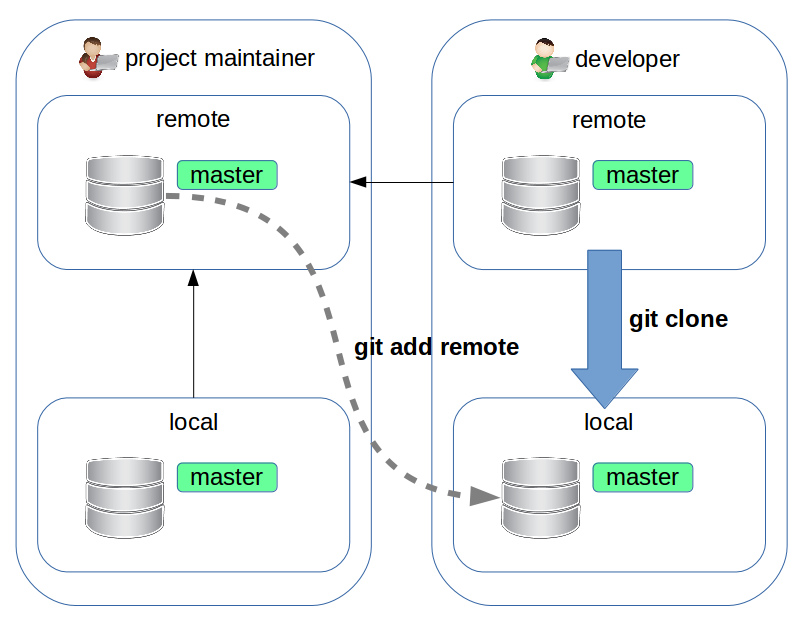
Forking workflow: developer setup
The developer will now crete a local clone of the remote repository. It's a good idea to add an "upstream" remote that points to the maintainer's repository:
$ git clone https://git.lattuga.net/developer/repo.git
$ cd repo
$ git remote add upstream https://git.lattuga.net/maintainer/repo.git
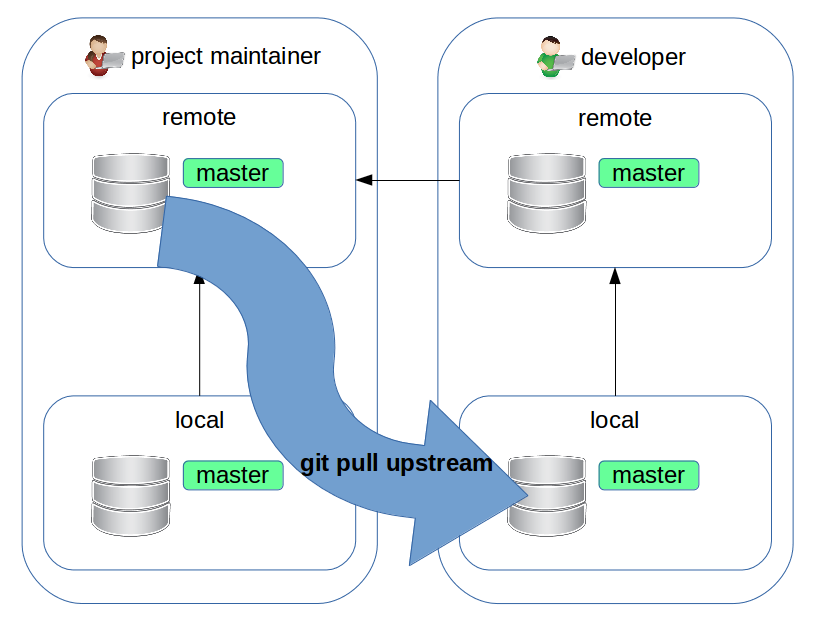
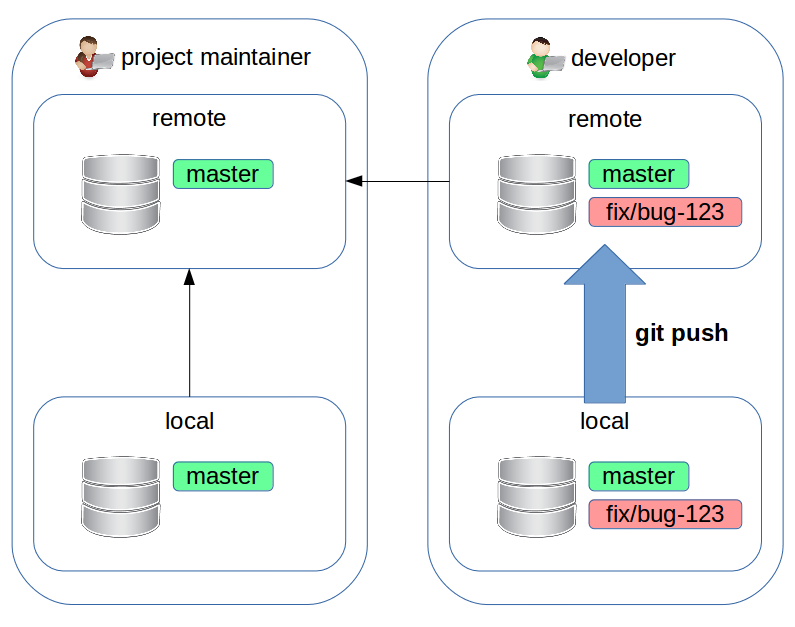
Forking workflow: let's start with the development
The developer writes fix that will be applied to the master branch of the upstram repository.
First of all, it's a good idea to sync the local master branch with the upstream one, to work on up-to-date code:
$ git checkout master
$ git pull upstream master
Forking workflow: new branch
$ git checkout -b fix/bug-123
Bonus track
- NEVER work directly on master: you would lose the possibility to sync again with upstream, in the future
Forking workflow: do our work
$ # introduce the fix
$ git commit
$ git push --set-upstream origin fix/bug-123
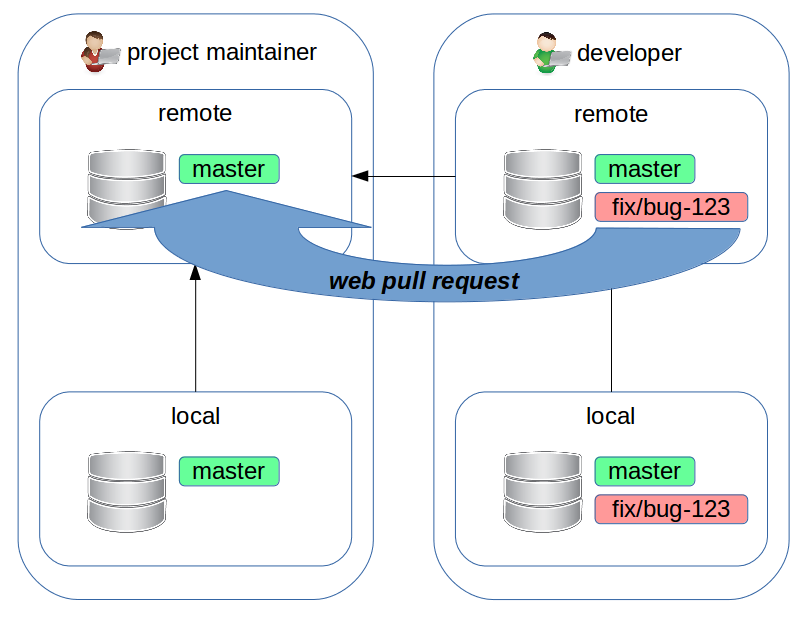
Forking workflow: pull request
Now the developer goes to the web page of the fork and creates a pull request.
Bonus track
- it makes sense to do a rebase on upstream/master of the feature branch we are working on, before the pull request is done (if you have already pushed, you need to push --force), so that your work will be as close as possible to the current state of upstream/master
Forking workflow: pull request
"Pull request" is not (exactly) a concept of Git itself. It's something built upon it, to ease the collaboration between developers.
The pull request we created above just says: "I suggest to apply the changes in the developer:fix/bug-123 branch onto maintainer:master" Now the developer, project maintainer and others can discuss the merit of the changes.
If needed, the deleloper or others can add new commits with just a simple push.
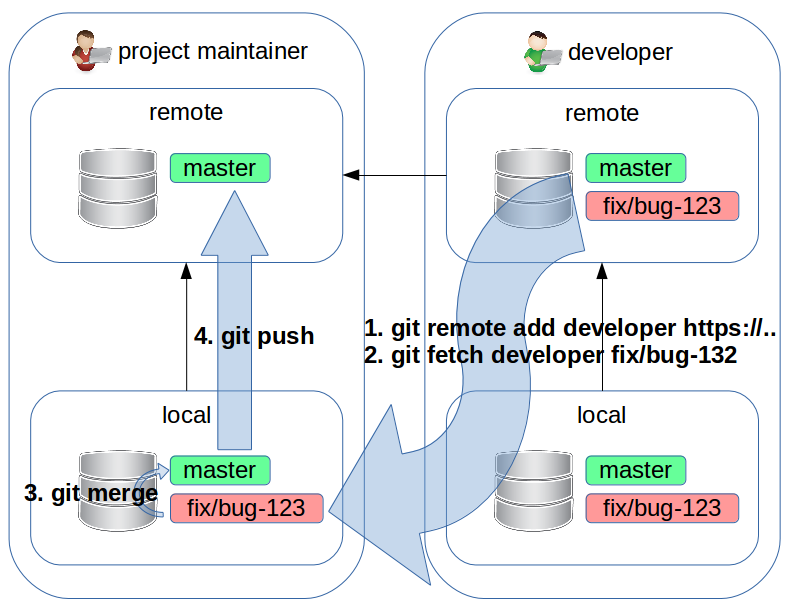
Forking workflow: merging
Once everyone is satisfied, the project maintainer will merge the code on maintainer:master.
If there are no conflicts, the merge can be done directly from the web GUI of the upstream repository.
If there are conflicts, the project maintainer will add a remote pointing to the repository of developer, fetch developer:fix/bug-123, merge it on master and then (after the conflicts are solved) push it on the upstream repository.
Forking workflow: I lied!
Github and friend will not suggest you to add the developer's repository as a remote, but to directly pull only the topic branch. It makes sense if you receive a lot of pull requests from many developers. Otherwise, if the number of developers is low (small projects, or inside a company) it makes sense to add developers' repositories as remotes.
To show you, Github suggests to:
- git checkout -b developer/bug-123 master
- git pull https://github.com/developer/repo.git fix/bug-123
- git checkout master
- git merge --no-ff developer/bug-123
- git push origin master
Forking workflow: maintainer's setup summary
- local clone: git clone https://git.lattuga.net/maintainer/repo.git
Forking workflow: developer's setup summary
- fork on the web GUI
- local clone of the fork: git clone https://git.lattuga.net/developer/repo.git
- add a remote pointing to the upstream repository: git remote add upstream https://git.lattuga.net/maintainer/repo.git
Forking workflow: developer's work summary
- update local master from upstream: git checkout master ; git pull upstream master
- create a branch to work on: git checkout -b fix/bug-123
- works a lot: git commit
- optionally, do a rebase: git rebase upstream/master
- sends changes to the remote repository: git push --set-upstream origin fix/bug-123
- create a pull request on the web GUI
- if needed, the developer updates the pull request with more commits and pushes of fix/bug-123
Forking workflow: maintainer's work summary
- receive and evaluate a pull request
- if it can be merged without conflicts, the merge can be done on the web GUI
Otherwise the maintainer will:
- if not already done, add a remote for the developer's repository: git remote add developer https://git.lattuga.net/developer/repo.git
- create a local tracking branch to work on: git fetch developer fix/bug-123
- move to master: git checkout master
- merge, resolving the conflicts: git merge --no-ff fix/bug-123
- send the commits to the remote repository: git push origin master
Part 3
Where we will see some advanced tools
How to reference commits
Going up of 3 livels, always following the first parent commit (in case of merge):
$ git show -s HEAD~3
Going up of 1 level, following the second parent commit (in case of merge):
$ git show -s HEAD^2
Bonus track
- detached HEAD: we moved (checkout) to a commit that is not the head of a branch
- these operators can be chained: HEAD~~^2
How to reference commits: range
Double dot range. Doing a diff, shows changes between "master" and "branch"; doing a log shows commits that can be reached by "branch" but not from "master":
$ git diff master..branch
Triple dot range. Doing a diff, shows changes between the forking point of "master" and "branch" and "branch" itself; doing a log, shows commits that are reachable from "master" or "branch" but not by both of them:
$ git log --left-right master...branch
How to reference commits: range
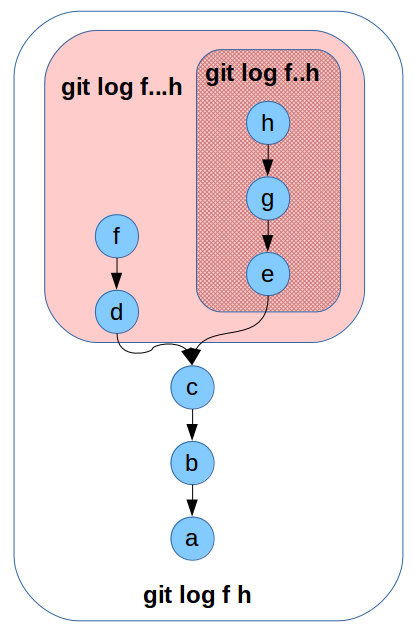
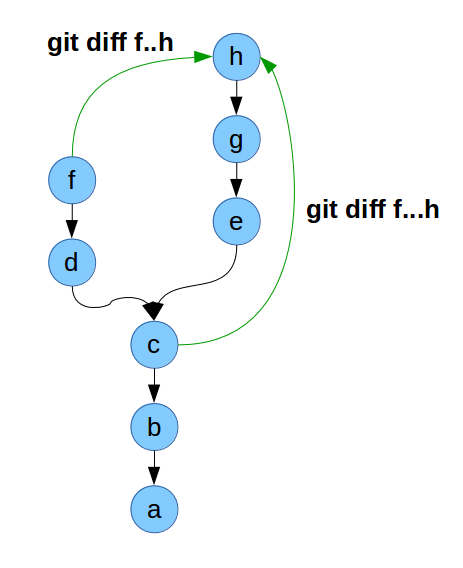
See also this description
Put the pieces back together: cherry-pick
$ git checkout master
$ git cherry-pick <commit>
$ # in case of conflicts: solve them, add the fixed files and then:
$ git cherry-pick --continue
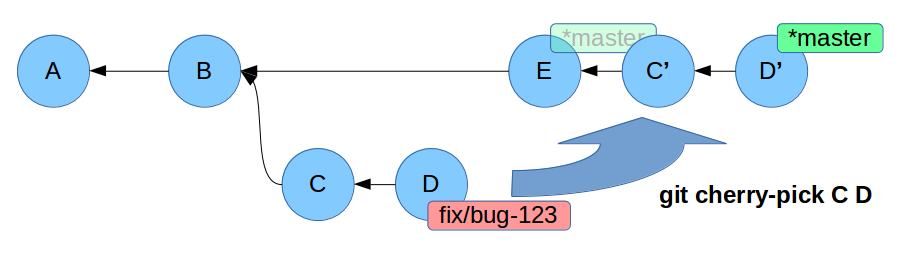
cherry-pick: what happened?
It takes a commit (usually) from another branch and apply it in the current branch.
New commits are created.
When to use it?
For example to backport a fix on different release branches, or if you noticed that a commit was meant to be done on a different branch.
Put the pieces back together: rebase
Let's recreate the same situation when we used merge (divergent branches) and then:
$ git checkout fix/bug-123
$ git rebase master
$ # in case of conflicts: solve them, add the fixed files and then:
$ git rebase --continue
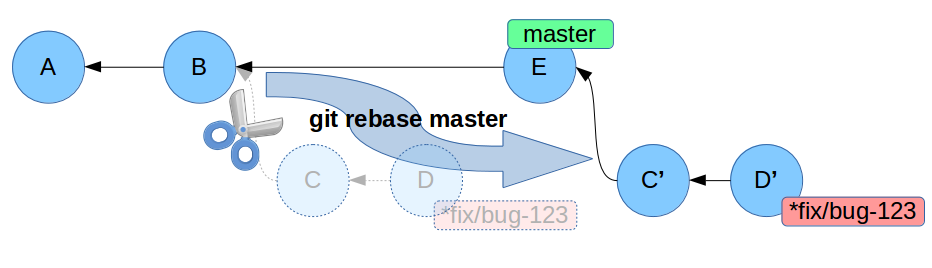
What happened?
We took all the commits in fix/bug-123 and we have applied them again on master (which advanced, meanwhile). Now all the commits of fix/bug-123 have changed. If you want, it's now possible to do a fast-forward merge on master.
Rebase: when to use it?
When you need to move multiple commits and/or you need to do a "clean" merge. It can be done by the developer before a pull request is opened, to ease the job of the maintainer or by the mainter just before the merge, to get a linear history.
When NOT to use it?
A rebase changes the original commits: you should avoid it if the commits were already pushed and other developers are using the remote branch.
Modify the history: rebase interactive
Let's create a new branch and commit 2 or 3 changes. Then:
$ git rebase -i master
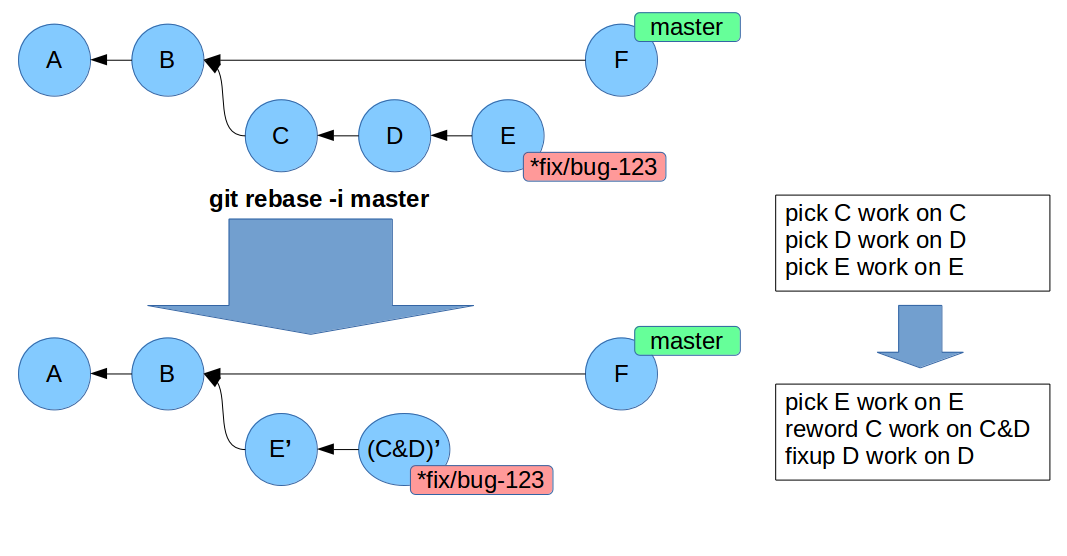
Rebase interactive: what happened?
We joined, removed or changed the order of the commits.
It's especially useful when we have finished the work on a branch, and we want to clear the history joining multiple commits into a single one.
Bonus track
- the nuclear option: filter-branch to create scripts that rewrite the history
Partial work: commit only some lines of a file
Let's edit a file in multiple lines, and then add it to the staging area with --patch:
$ git add --patch
When to use it?
For example when you don't want to include in a commit a debug line, but you still want to keep it in the working directory for future use.
Create and apply a patch
It's possible to create a patch with this command:
$ git format-patch [refs]
and then apply it with:
$ git apply patch-file.diff
Putting some work aside: stash
Store work currently present in the working directory without committing, and show the stashed changes:
$ git stash
$ git stash list
Apply again the shashed changes, and remove a stash (stash pop will join the two commands):
$ git stash apply stash@{0}
$ git stash drop stash@{0}
When to use it?
When we want to move to another branch, but we are still not ready to commit the (conflicting) changes present in the working directory.
History of the changes: reflog
The log history only shows commits included in a branch.
To see ALL the times HEAD changed position:
$ git reflog [@{2 weeks ago}]
When to use it?
- sometimes it's useful to see how we moved between branches
- very useful to recover broken commits that are no longer referenced by any branch (but don't forget that they will be garbage collected, at some point)
Misc stuff
- handle big files: https://git-lfs.github.com/
- another option to handle big files: https://git-annex.branchable.com/
- manage the /etc directory: etckeeper
- manage multiple repositories: https://source.android.com/source/using-repo
- git repository manager: https://about.gitlab.com/
- another git repository manager: https://gogs.io/
What's missing
- git submodule: manage other repositories as sub-modules
- git subtree: insert a repository into a subdirectory
- repo: manage multiple Git repositories
- git bisect: look for the commit that introduced a bug
- git gui and gitk: GUI to visualize commits and repositories
- tig: textual interface
- Gitgraph.js: create graphs from commits and branches
Various resources
- Italian translation of these slides: https://git.lattuga.net/alberanid/git-crash-course
- Pro Git: https://git-scm.com/book/en/
- Reference: https://git-scm.com/docs
- Learn Git Branching: http://learngitbranching.js.org/
- Git ready: http://gitready.com/
- Git Cookbook: https://git.seveas.net/
- tutorial di Atlassian: https://www.atlassian.com/git/tutorials
- A visual Git reference: https://marklodato.github.io/visual-git-guide/index-en.html
Utilities
- bash prompt: https://github.com/magicmonty/bash-git-prompt
- Meld: http://meldmerge.org/
The end
git clone https://git.lattuga.net/alberanid/git-crash-course-en.git
Davide Alberani da@erlug.linux.it
This work is licensed under the Creative Commons Attribution-ShareAlike 4.0 International License: http://creativecommons.org/licenses/by-sa/4.0/