
dev.md 8.0 KB
Developper documentation
Developper documentation is currently poor but don't hesitate to help writing it.
Installation instructions
This is the procedure to install AirBoarGame application from scratch for to initialize your development environment, or simply to have the system in your own machine / server and host games or play.
AirBoarGame application contains two parts:
- a server part (named Backend)
- and a client part.
Prerequisite
You need Node.js >= v16 with npm >= v7. For that, you can (and should) use nvm to install and manage your Node.js environment. Execute
nvm usein project root folder to start the right environment.You need to download the last version of AirBoardGame source code into a local folder. You can get it:
- By downloading the source zip file and decompress it into a local folder.
- By cloning it with git :
git clone git@github.com:jrmi/airboardgame.git. You may need to create a github account to proceed this way.
Backend 1/2 - start and configure Ricochet.js server
First, you need an up and running instance of Ricochet.js server. You can create yours by following the instructions in this section or you can use any existing instance.
To start a local instance, execute:
cd backend
npm ci # install dependencies
cp .env.dist .env
Now, you have the opportunity to customize Ricochet.js configuration by editing the
.env file. Default values should be fine for quick testing purpose but remember
that data are only stored in memory so you'll loose
all your changes each time you stop the ricochet.js server with these defaults.
Don't try to fill the RICOCHET_SITE_KEY already because you need to register the
Airboardgame site before, but you might want to change the STORE_BACKEND
and FILE_STORE here to persist data.
Here's an example configuration to persist data locally:
FILE_STORE_BACKEND=disk
DISK_DESTINATION=/path/to/directory/

JSON_STORE_BACKEND=nedb
NEDB_DIRNAME=/path/to/nedb/database
The two configured paths should be existing and have write permissions for current user.
See Ricochet.js documentation for more options.
Now you can start the ricochet.js server:
npm run ricochetjs
Then create the Airboardgame Ricochet site by visiting your ricochet.js
server URL with a browser and fill the site creation form. Default Ricochet
server URL, if you haven't modified the configuration should be http://localhost:4050/.
This is a 3 step process:
1) Fill the site creation form with valid data 2) Validate the form and save the secret site key for later use 3) Visit the confirmation link to activate the site
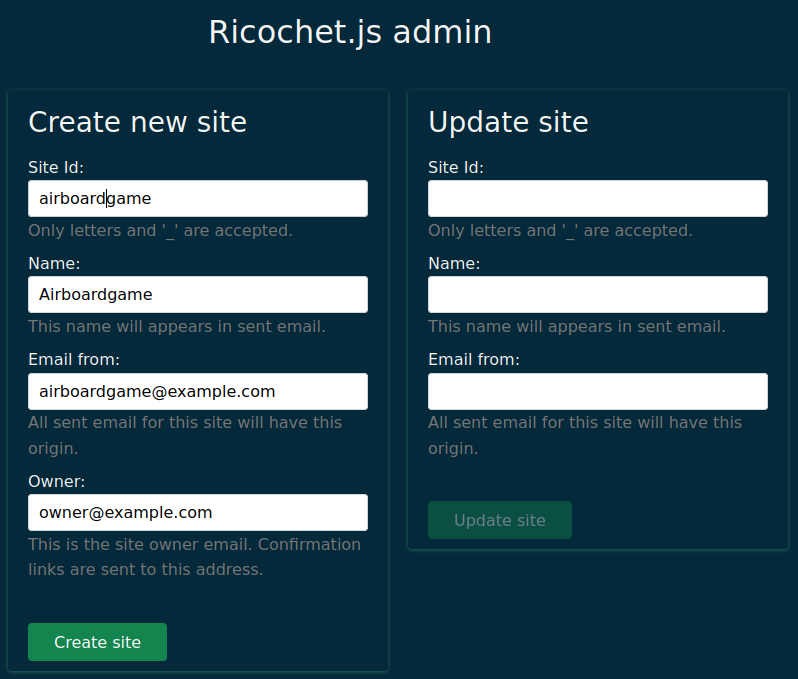
Step 1 - Fill the site creation form
The only important value here is Site id that should have the airboardgame
value.
Here's an example:
Step 2 - Validate the form and save the site secret key
Submit the form by clicking the create site button.

Since the form is submitted, save the displayed key and customize
.env file using this key to set the RICOCHET_SITE_KEY.
Step 3 - Activate the site by clicking the confirmation link
Remember to confirm the site creation by clicking the link sent by Ricochet.js to
the owner email. If your are using a local instance of ricochet with the fake
server email (should be the default configuration) the mail is displayed in the
ricochet.js console.

Otherwise ensure you have given a valid email address and check the spam if you don't receive the email.
Now you can stop the ricochet.js server (we are going to start it with the rest
of the stack in the next step) by using ctrl+c in the server shell.
Backend 2/2 - Start the backend stack
To start the stack just execute:
npm run all
Actually, this command launch 3 other commands:
npm run ricochejsfor the Ricochet.js servernpx wire.io@latestfor the realtime wire.io websocket relaynpm run watchthat watch for backend code modifications to build the backendricochet.jsonfile.
If you need more informations or more flexibility you might want to visit More details on server section.
In the next section your going to start the web client that connect to this server part.
Client
In another terminal, go back to project root and execute:
cd <project_root>/
npm ci
cp .env.dist .env
Customize the .env file. Default should be fine if you haven't modified
server configuration host, port and Site Id.
⚠️ Make sure you have the same value for VITE_RICOCHET_SITEID as the Site Id you
used to register the site during the Fill the site creation form of backend
installation.
Then you can start the client:
npm start
The last command should open the frontend URL in your browser.
Now you should have two terminals:
- first with:
- the Ricochet.js server. Backend logs can be found here.
- a
wire.ioserver running - and the auto build on change for Airboardgame backend files
- and another with web-frontend server
Troubleshooting
If you have troubles getting everything to work, you can first try to launch the check script from the project root directory:
npm run check
It should helps you to point out what's wrong with your installation.
If you still can't make it works, join us on discord or through github.
(Optional) More details on server
When you start the backend part of Airboardgame, you need to start 3 commands.
You can start all by using the npm run all command but sometimes you may want
more control over how everything is working, for deployment or debugging. In this
section you'll find a quick explanation of each command.
Ricochet.js server
You can start the Ricochet.js server by executing:
npm run ricochetjs
If you need more details on Ricochet.js please visit the
project page.
Watch & build the backend Airboargame code
You can start backend code modifications monitoring to generate
code executed by Ricochet.js from the backend/ directory:
npm run watch
You also can generate the backend code once by executing:
npm run build
These two commands generate the public/ricochet.json file that is executed
on Ricochet.js server. This is the actual Airboardgame specific backend code.
Start wire.io socket.io server relay
To allow real time communication between clients, you need to start an instance of wire.io server.
To proceed, execute in the backend/ directory:
# /!\ Need npm >= v7
npx wire.io@latest
See wire.io documentation for more information on how to configure it if you need more options.
Launch e2e tests
Execute the following command:
npm run cypress:open
This open the Cypress console.
Deploy a production instance
Section in progress...
To deploy an instance in production you need to deploy the same stack as in dev.
- You need a Ricochet.js server.
- You need a Wire.io server.
- Build the backend
ricochet.jsonfile. (it will be included automatically with the frontend) - Build the frontend and deploy it to a CDN or with any static file server (Apache, Nginx, ...).
Advice
- You need to redirect all frontend requests to the
index.htmlpage as it's a single page app.
Contributing guide
Section in progress...
Z-index stack
- 250 -> 299 : Top UI element like modals, Color selector, ...
- 200 -> 249 : over items like navbar, side panels, selector, cookie notice, bottom button bar...
- 100 -> 199 : items zone. All items on the board have these values
- 0 -> 99 : underlay like board, background, ...